Choyong WT2 Multifunction Walkie-Talkie with Two Operating Modes
Manual
Introduction
The Choyong WT2 is a versatile, multifunctional communication device that offers both a long range and a rich entertainment experience. It combines global public network intercom functions, analog intercom functions, Internet radio, and an AI voice assistant. This manual contains detailed instructions for setting up, operating, and maintaining your WT2 device.

Setup
1. Connect to Wi-Fi
In standby mode, press the “0” key to open the “Settings” menu. Select the Wi-Fi network you want to connect to. Use the device’s buttons (up/down arrow keys) to select characters on the on-screen keyboard, and the OK button to enter them. After you’ve entered all the required characters, select the “Connect” icon on the on-screen keyboard to enter the password and establish the connection.
Notes on the Wi-Fi Connection:
This device supports only the WPA/WPA2 encryption protocols. If the Wi-Fi connection still does not work after entering the correct password, please check your router settings and make sure the encryption protocol is not set to WPA2/WPA3.
If you are using a mesh network, make sure the fast roaming feature is disabled, as it can cause Wi-Fi malfunctions. This device supports only 2.4 GHz Wi-Fi.
2. Activating the Built-in eSIM
The Choyong WT2 does not have a physical SIM card slot. To use a 4G network outdoors, you must activate the built-in eSIM feature.
- Purchase a data plan: Visit the official Choyong website (www.choyongradio.com) to purchase a data plan.
- Alternatively, you can follow the instructions under Settings → eSIM on the device to purchase and activate the eSIM.
The system automatically selects the best available 4G carrier based on your local network coverage. If you do not wish to use the eSIM, you can still access the network outdoors via your cell phone’s hotspot.
3. Inserting the TF Card
Turn off the device before inserting the TF card.
After inserting the card, turn the device back on to use it as usual.
4. Charging the Battery
The device is powered by a rechargeable 2500-mAh lithium battery. A USB Type-C cable is included.
- Connect the Type-C cable to a 5V power adapter.
- You can use any standard cell phone charger, as the mobile fast-charging protocol automatically adjusts the charger’s output voltage to 5 V when charging the device.
IMPORTANT: DO NOT use an iPad charger or a computer charger to charge the device.
Note: If the device is playing media while charging, the charging time will be significantly longer.
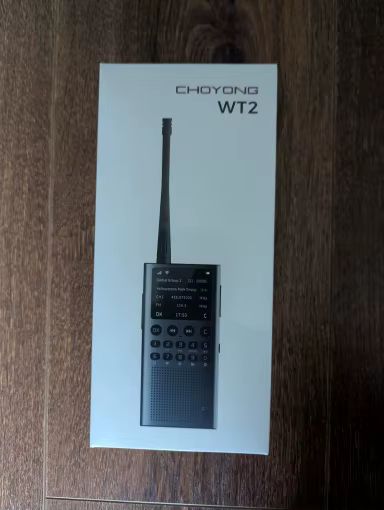
The Choyong WT2 charges via its USB-C port
1. Basic Device Operation
Power On/Off: Press and hold the ON/OFF ( ) button to turn the device on or off.
Volume Control: Use the Volume + and Volume - buttons to adjust the audio level.
Navigation: Use the Previous ( ) and Next (►) buttons to navigate through content or menus.
Confirmation: Briefly press the OK button to confirm your selection.
Return: Briefly press the Return (C) button to return to the previous menu.
2. Key Functions
PTT Button: Press briefly to activate the intercom function. Highlight and select intercom mode, then press and hold to speak.
Button 1 (Ai Button): Press and hold on the standby screen to search for programs using the AI voice assistant.
Button 2 (FM Quick Button): Press briefly to switch to FM mode. In FM mode, press and hold to activate the ATS function (Automatic Station Search and Memory System).
Button 3 (SW/MW Quick-Access Button): Press briefly to switch to SW mode, and press again to switch to MW mode. In SW mode, press and hold to activate the ATS function for SW. In MW mode, press and hold to activate the ATS function for MW mode.
Number 4 (VF/VM Switch Button): In FM/AM mode, press briefly to toggle between frequency mode (FREQ) and preset channel mode (ADDR).
Button 5 (Pause/Play Button): In playback mode, press briefly to pause playback; in standby or pause mode, press briefly to resume playback.
Button 6 (Menu button): Press briefly to open the menu interface.
Button 7 (Favorites button): In standby mode, press briefly to open the favorites list. In playback mode, press briefly to save the currently playing program.
Button 8 (Record button): When playing online programs, press briefly to activate the recording function. In radio mode, press briefly to change the reception bandwidth. In standby mode, press briefly to play back recordings.
Number 9 (Local File Key): Press briefly to play programs or recordings stored on the TF card.
Button 0 (Settings Button): In standby mode, press briefly to open the settings interface. In radio mode, press briefly to enable keyboard input.
3. Intercom in the Background (Standby)
Once the radio’s background standby function is activated, intercom messages can be received in real time. However, this significantly reduces the standby time. If the intercom function is not in use, it is recommended that you deactivate the background standby function.

The Choyong WT2 supports both analog intercom connections with a range of 5 km and public intercom connections with a range of 50,000 km.
4. Using a Telescopic Antenna
Intercom Mode: Retract the antenna to ensure efficient transmission and reception.
Radio Mode: Extend the telescopic antenna to improve reception.
Caution: Do not activate the intercom function while removing the telescopic antenna. Doing so may damage the analog intercom amplifier module.
5. Bluetooth Playback
This device supports Bluetooth transmission. You can listen to the programs being played through a Bluetooth speaker or Bluetooth headphones. The Bluetooth function can be configured in the Settings → Bluetooth menu.
6. Voice Search Function (GPT AI)
With the built-in GPT AI voice assistant, you can request radio stations, podcasts, or songs using voice commands.
Press and hold the Number 1 (Ai key) button.
Wait until the microphone icon on the screen starts flashing.
Say the name of the radio station or the content you’re looking for.
Tip: Please say only the names of the radio stations to ensure more accurate search results.

Voice-activated GPT search for radio stations via GPT AI
7. How to Add a Station/Podcast
You can add new stations or podcasts to your device in the following ways:
Method 1: Through the official Choyong website
Visit www.choyongradio.com to search for stations or podcasts.
Add them directly to your device under the “My Favorites” menu item.
Method 2: By scanning a QR code with your cell phone
After scanning the code with your cell phone, enter the URL of the radio station you want to add into the address bar.
Make sure the URL is a link to an audio file (e.g., ending with .mp3, .m3u8, .aac) rather than a regular website address.

The Choyong WT2 can receive over 50,000 streaming channels worldwide
Maintenance
To ensure the longevity and optimal performance of your Choyong WT2, please follow these general maintenance guidelines:
Cleaning: Use a soft, dry cloth to clean the device. Avoid using harsh chemicals or abrasive cleaners.
Storage: Store the device in a cool, dry place away from direct sunlight and extreme temperatures.
Water Exposure: The device is not waterproof. Avoid contact with water and high humidity.
Physical Damage: Protect the device from drops and impacts.
Troubleshooting
Problem: Certain stations cannot be played after a successful network connection.
Solution: The station may not be broadcasting at this time of day (note the different time zones).
Solution: The station’s server capacity may be insufficient due to too many users.
Solution: The internet connection between the radio and the radio station’s server may be too slow or unstable to support the broadcast data rate.
Solution: The radio station’s link may be outdated. Please contact Choyong support to update the station list.
Problem: Cannot connect to a Wi-Fi network.
Solution: Make sure the Wi-Fi network has Internet access when connected to another device (i.e., that you can browse the Internet).
Solution: This radio only supports 2.4-GHz Wi-Fi and does not support 5-GHz Wi-Fi.
Solution: Check the router’s encryption protocol; this radio only supports WPA/WPA2, but not WPA3.
Solution: The radio does not support Wi-Fi repeaters.
Problem: Insufficient Wi-Fi signal strength.
Solution: Check the distance to the router. Verify whether a computer or cell phone can connect to the network at this location. If the signal is weak, please choose a more suitable location for the router.
Problem: The radio has frozen or is no longer responding.
Solution: Perform a forced restart of the radio. Press and hold the “ON/OFF” button ( ) for 5 seconds until the radio restarts (a white screen appears), then release the button.
Problem: The radio’s screen is black and unresponsive, regardless of whether buttons are pressed or the device is charging.
Solution: Press and hold the power button for 30 seconds, release it, then press and hold it again for 5 seconds until the screen lights up, and then release it. The device should now function normally again.
Solution: If it still doesn’t work, please check whether the battery needs to be charged.
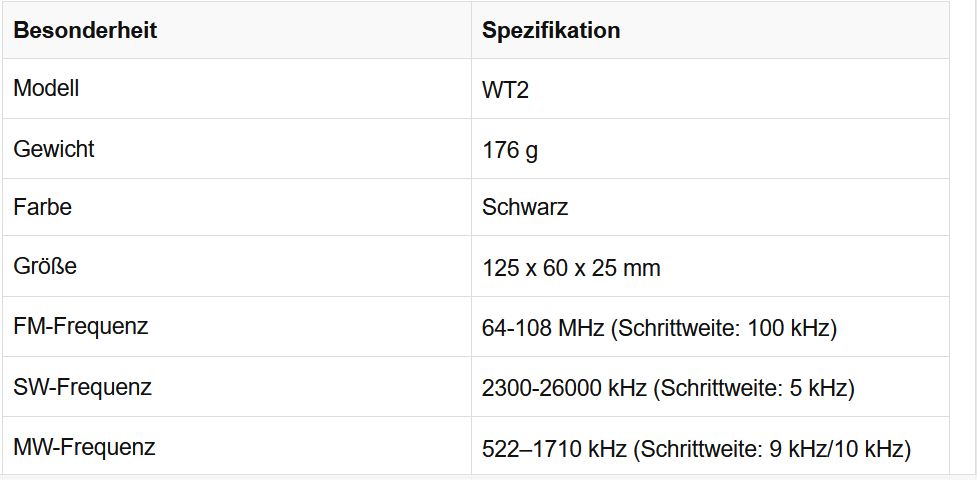
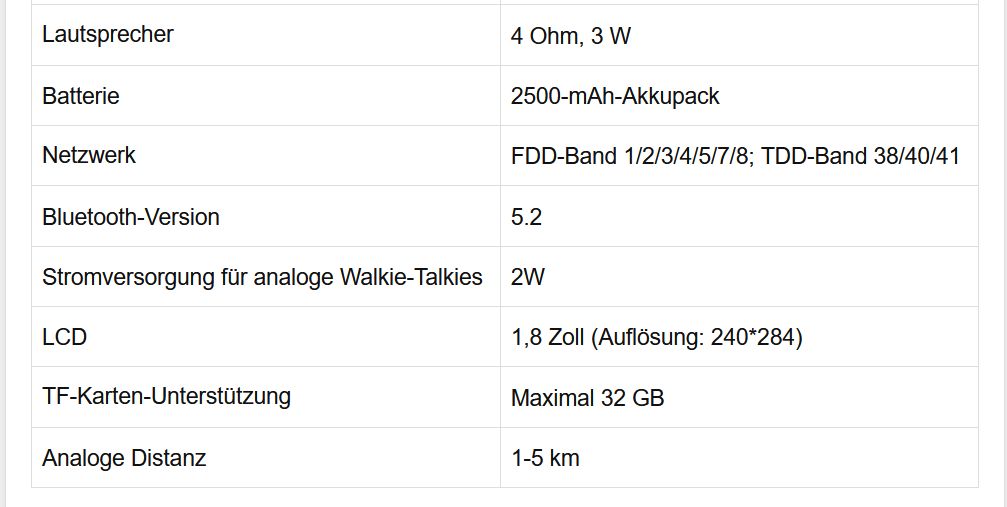
Technical Specifications
User Tips
Radio Selectivity: The device is equipped with a TEF6686 chip, which contributes to extremely high radio selectivity, especially for FM and SW reception.
Internet Radio: Take advantage of over 40,000 Internet radio stations available worldwide via Wi-Fi or eSIM. These are categorized by continent, country, state, city, station type, and popularity to make browsing easier.
Voice Assistant: Use the GPT AI voice assistant for quick access to radio stations, podcasts, or music. Remember to speak clearly and say only the station’s name for optimal results.
Custom Stations: For ultimate playback flexibility, you can add custom streaming stations by entering a valid audio URL (supporting MP3, AAC, and m3u8 formats) directly on the device.
Analog Two-Way Radio Function: The analog two-way radio function supports manual frequency programming and communication with other walkie-talkies. Features such as Direct Connect mode, Repeater mode, and various encryption options are available.
Firmware Updates: Keep an eye on the official Facebook group and YouTube channel for announcements about firmware updates. Check regularly under “Settings” → “About” to see if new versions are available so you can benefit from feature enhancements and bug fixes.
TF Card for Updates: Use a high-quality TF card (max. 32 GB) for firmware updates. If an update fails, try formatting the card or downloading the firmware from the official website and using a Windows computer.
Firmware Upgrade Instructions
Your device may occasionally receive updates to add new features or fix bugs. We will announce these updates on our official Facebook group and YouTube channel. You can follow our official accounts or check for new versions under “Settings” → “About.”
Once a new version is available, please insert a high-quality TF card (with a maximum capacity of 32 GB) into the device.
Follow the on-screen instructions to complete the update.
If the upgrade fails:
Remove the TF card and check whether the device is still functioning properly. If it works normally, you can format the TF card and try the upgrade again.
Alternatively, you can download the latest firmware from the official Choyong website (www.choyongradio.com) and perform the upgrade using a Windows computer.
Support
For more details and usage tips, see the instructional videos on YouTube:
https://www.youtube.com/@choyongradio
For our 24-hour customer service, please contact:
choyongradio@gmail.com
Official Website:
www.choyongradio.com
Manual
Introduction
The Choyong WT2 is a versatile, multifunctional communication device that offers both a long range and a rich entertainment experience. It combines global public network intercom functions, analog intercom functions, Internet radio, and an AI voice assistant. This manual contains detailed instructions for setting up, operating, and maintaining your WT2 device.
Setup
1. Connect to Wi-Fi
In standby mode, press the “0” key to open the “Settings” menu. Select the Wi-Fi network you want to connect to. Use the device’s buttons (up/down arrow keys) to select characters on the on-screen keyboard, and the OK button to enter them. After you’ve entered all the required characters, select the “Connect” icon on the on-screen keyboard to enter the password and establish the connection.
Notes on the Wi-Fi Connection:
This device supports only the WPA/WPA2 encryption protocols. If the Wi-Fi connection still does not work after entering the correct password, please check your router settings and make sure the encryption protocol is not set to WPA2/WPA3.
If you are using a mesh network, make sure the fast roaming feature is disabled, as it can cause Wi-Fi malfunctions. This device supports only 2.4 GHz Wi-Fi.
2. Activating the Built-in eSIM
The Choyong WT2 does not have a physical SIM card slot. To use a 4G network outdoors, you must activate the built-in eSIM feature.
- Purchase a data plan: Visit the official Choyong website (www.choyongradio.com) to purchase a data plan.
- Alternatively, you can follow the instructions under Settings → eSIM on the device to purchase and activate the eSIM.
The system automatically selects the best available 4G carrier based on your local network coverage. If you do not wish to use the eSIM, you can still access the network outdoors via your cell phone’s hotspot.
3. Inserting the TF Card
Turn off the device before inserting the TF card.
After inserting the card, turn the device back on to use it as usual.
4. Charging the Battery
The device is powered by a rechargeable 2500-mAh lithium battery. A USB Type-C cable is included.
- Connect the Type-C cable to a 5V power adapter.
- You can use any standard cell phone charger, as the mobile fast-charging protocol automatically adjusts the charger’s output voltage to 5 V when charging the device.
IMPORTANT: DO NOT use an iPad charger or a computer charger to charge the device.
Note: If the device is playing media while charging, the charging time will be significantly longer.
The Choyong WT2 charges via its USB-C port
1. Basic Device Operation
Power On/Off: Press and hold the ON/OFF ( ) button to turn the device on or off.
Volume Control: Use the Volume + and Volume - buttons to adjust the audio level.
Navigation: Use the Previous ( ) and Next (►) buttons to navigate through content or menus.
Confirmation: Briefly press the OK button to confirm your selection.
Return: Briefly press the Return (C) button to return to the previous menu.
2. Key Functions
PTT Button: Press briefly to activate the intercom function. Highlight and select intercom mode, then press and hold to speak.
Button 1 (Ai Button): Press and hold on the standby screen to search for programs using the AI voice assistant.
Button 2 (FM Quick Button): Press briefly to switch to FM mode. In FM mode, press and hold to activate the ATS function (Automatic Station Search and Memory System).
Button 3 (SW/MW Quick-Access Button): Press briefly to switch to SW mode, and press again to switch to MW mode. In SW mode, press and hold to activate the ATS function for SW. In MW mode, press and hold to activate the ATS function for MW mode.
Number 4 (VF/VM Switch Button): In FM/AM mode, press briefly to toggle between frequency mode (FREQ) and preset channel mode (ADDR).
Button 5 (Pause/Play Button): In playback mode, press briefly to pause playback; in standby or pause mode, press briefly to resume playback.
Button 6 (Menu button): Press briefly to open the menu interface.
Button 7 (Favorites button): In standby mode, press briefly to open the favorites list. In playback mode, press briefly to save the currently playing program.
Button 8 (Record button): When playing online programs, press briefly to activate the recording function. In radio mode, press briefly to change the reception bandwidth. In standby mode, press briefly to play back recordings.
Number 9 (Local File Key): Press briefly to play programs or recordings stored on the TF card.
Button 0 (Settings Button): In standby mode, press briefly to open the settings interface. In radio mode, press briefly to enable keyboard input.
3. Intercom in the Background (Standby)
Once the radio’s background standby function is activated, intercom messages can be received in real time. However, this significantly reduces the standby time. If the intercom function is not in use, it is recommended that you deactivate the background standby function.
The Choyong WT2 supports both analog intercom connections with a range of 5 km and public intercom connections with a range of 50,000 km.
4. Using a Telescopic Antenna
Intercom Mode: Retract the antenna to ensure efficient transmission and reception.
Radio Mode: Extend the telescopic antenna to improve reception.
Caution: Do not activate the intercom function while removing the telescopic antenna. Doing so may damage the analog intercom amplifier module.
5. Bluetooth Playback
This device supports Bluetooth transmission. You can listen to the programs being played through a Bluetooth speaker or Bluetooth headphones. The Bluetooth function can be configured in the Settings → Bluetooth menu.
6. Voice Search Function (GPT AI)
With the built-in GPT AI voice assistant, you can request radio stations, podcasts, or songs using voice commands.
Press and hold the Number 1 (Ai key) button.
Wait until the microphone icon on the screen starts flashing.
Say the name of the radio station or the content you’re looking for.
Tip: Please say only the names of the radio stations to ensure more accurate search results.
Voice-activated GPT search for radio stations via GPT AI
7. How to Add a Station/Podcast
You can add new stations or podcasts to your device in the following ways:
Method 1: Through the official Choyong website
Visit www.choyongradio.com to search for stations or podcasts.
Add them directly to your device under the “My Favorites” menu item.
Method 2: By scanning a QR code with your cell phone
After scanning the code with your cell phone, enter the URL of the radio station you want to add into the address bar.
Make sure the URL is a link to an audio file (e.g., ending with .mp3, .m3u8, .aac) rather than a regular website address.
The Choyong WT2 can receive over 50,000 streaming channels worldwide
Maintenance
To ensure the longevity and optimal performance of your Choyong WT2, please follow these general maintenance guidelines:
Cleaning: Use a soft, dry cloth to clean the device. Avoid using harsh chemicals or abrasive cleaners.
Storage: Store the device in a cool, dry place away from direct sunlight and extreme temperatures.
Water Exposure: The device is not waterproof. Avoid contact with water and high humidity.
Physical Damage: Protect the device from drops and impacts.
Troubleshooting
Problem: Certain stations cannot be played after a successful network connection.
Solution: The station may not be broadcasting at this time of day (note the different time zones).
Solution: The station’s server capacity may be insufficient due to too many users.
Solution: The internet connection between the radio and the radio station’s server may be too slow or unstable to support the broadcast data rate.
Solution: The radio station’s link may be outdated. Please contact Choyong support to update the station list.
Problem: Cannot connect to a Wi-Fi network.
Solution: Make sure the Wi-Fi network has Internet access when connected to another device (i.e., that you can browse the Internet).
Solution: This radio only supports 2.4-GHz Wi-Fi and does not support 5-GHz Wi-Fi.
Solution: Check the router’s encryption protocol; this radio only supports WPA/WPA2, but not WPA3.
Solution: The radio does not support Wi-Fi repeaters.
Problem: Insufficient Wi-Fi signal strength.
Solution: Check the distance to the router. Verify whether a computer or cell phone can connect to the network at this location. If the signal is weak, please choose a more suitable location for the router.
Problem: The radio has frozen or is no longer responding.
Solution: Perform a forced restart of the radio. Press and hold the “ON/OFF” button ( ) for 5 seconds until the radio restarts (a white screen appears), then release the button.
Problem: The radio’s screen is black and unresponsive, regardless of whether buttons are pressed or the device is charging.
Solution: Press and hold the power button for 30 seconds, release it, then press and hold it again for 5 seconds until the screen lights up, and then release it. The device should now function normally again.
Solution: If it still doesn’t work, please check whether the battery needs to be charged.
Technical Specifications
User Tips
Radio Selectivity: The device is equipped with a TEF6686 chip, which contributes to extremely high radio selectivity, especially for FM and SW reception.
Internet Radio: Take advantage of over 40,000 Internet radio stations available worldwide via Wi-Fi or eSIM. These are categorized by continent, country, state, city, station type, and popularity to make browsing easier.
Voice Assistant: Use the GPT AI voice assistant for quick access to radio stations, podcasts, or music. Remember to speak clearly and say only the station’s name for optimal results.
Custom Stations: For ultimate playback flexibility, you can add custom streaming stations by entering a valid audio URL (supporting MP3, AAC, and m3u8 formats) directly on the device.
Analog Two-Way Radio Function: The analog two-way radio function supports manual frequency programming and communication with other walkie-talkies. Features such as Direct Connect mode, Repeater mode, and various encryption options are available.
Firmware Updates: Keep an eye on the official Facebook group and YouTube channel for announcements about firmware updates. Check regularly under “Settings” → “About” to see if new versions are available so you can benefit from feature enhancements and bug fixes.
TF Card for Updates: Use a high-quality TF card (max. 32 GB) for firmware updates. If an update fails, try formatting the card or downloading the firmware from the official website and using a Windows computer.
Firmware Upgrade Instructions
Your device may occasionally receive updates to add new features or fix bugs. We will announce these updates on our official Facebook group and YouTube channel. You can follow our official accounts or check for new versions under “Settings” → “About.”
Once a new version is available, please insert a high-quality TF card (with a maximum capacity of 32 GB) into the device.
Follow the on-screen instructions to complete the update.
If the upgrade fails:
Remove the TF card and check whether the device is still functioning properly. If it works normally, you can format the TF card and try the upgrade again.
Alternatively, you can download the latest firmware from the official Choyong website (www.choyongradio.com) and perform the upgrade using a Windows computer.
Support
For more details and usage tips, see the instructional videos on YouTube:
https://www.youtube.com/@choyongradio
For our 24-hour customer service, please contact:
choyongradio@gmail.com
Official Website:
www.choyongradio.com